
Key Takeaway
Growing microgreens at home is a fun and easy way to get fresh greens. They don’t need much space or fancy equipment. Here’s what you need to know: – Microgreen farming at home is super simple.
You just need a shallow tray, some soil, seeds, and water. That’s it! – These tiny plants pack a big punch of nutrition. They’re full of vitamins and minerals.
– You can grow a bunch of different types. This means you can have a variety of flavors and nutrients right at your fingertips. – It doesn’t take long for them to grow.
In just a few weeks, you can go from seed to salad! – Growing your own microgreens is also cost-effective. It can save you money compared to buying them at the store. So, why not give it a try? It’s a small step towards healthier eating and it’s pretty fun too!
**Why Microgreens?**
### Unveiling the Secrets of Microgreen Farming at Home Microgreen farming at home is like unlocking a treasure chest of nutrition right in your living space. Imagine having a tiny, lush garden that doesn’t just make your home look great but also fills your plates with the freshest, nutrient-packed greens. Sounds wonderful, doesn’t it? Well, it’s not just a dream.
You can make it happen, and here’s how. #### What You Need to Start First things first, you’ll need some supplies. But don’t worry, we’re talking about simple stuff here.
Grab a shallow tray, some quality soil, and, of course, the seeds of your choice. Microgreens aren’t picky; they’ll sprout from just about any vegetable or herb seed. From spicy radishes to sweet peas, the choice is yours.
#### Sowing the Seeds of Success Now, let’s get down to the fun part: planting. Spread your soil in the tray and gently press down. Sprinkle the seeds evenly across the surface and cover them with a thin layer of soil.
A light mist of water, and you’re good to go. Place your tray in a spot with plenty of sunlight. A windowsill works wonders.
#### The Waiting Game and Beyond Patience is key, but not for long. In just a few days, you’ll see tiny shoots reaching for the sky. Keep the soil moist but not soaked.
microgreen farming at home
| Aspect | Importance | Tips |
|---|---|---|
| Lighting Conditions | Proper lighting is crucial for photosynthesis and healthy growth of microgreens. | Use LED grow lights for energy efficiency and optimal growth. |
| Soil Quality | High-quality soil ensures your microgreens get the necessary nutrients for growth. | Opt for organic potting mix specifically designed for seed starting. |
| Watering Schedule | Microgreens require consistent moisture but are sensitive to overwatering. | Water lightly to keep the soil moist but not waterlogged. |
| Harvesting Time | Timely harvesting ensures the highest nutrient content and flavor of microgreens. | Harvest when the first true leaves begin to emerge, typically 1-2 weeks. |
| Ventilation | Adequate airflow reduces the risk of mold and fungal diseases in microgreens. | Ensure good air circulation around your growing area to keep plants healthy. |
**Getting Started**
Starting a microgreen farming at home is like unlocking a treasure chest of greens right in your living space. It’s not only an easy and fun way to bring a dash of nature indoors but also a surefire way to ensure you have fresh, nutritious garnishes for your dishes. So, let’s dive into the world of microgreens and find out how you can become a green thumb guru from the comfort of your home.
Choosing Your Seeds First things first, picking the right seeds is crucial. Think of seeds like characters in a video game; each has its unique powers. Some popular microgreens include radish, kale, arugula, and mustard.
They’re like the superheroes of the plant world, packed with flavor and nutrients. Setting Up Your Growing Space You don’t need a backyard or a green thumb to start, just a little corner in your home. You can use shallow trays, and the best part? Soil isn’t always necessary.
Some microgreens thrive in hydroponic setups, which is just a fancy way of saying they grow in water. It’s like giving your plants a swimming lesson, and they love it! Lighting and Watering Microgreens are like toddlers; they need lots of care and attention. They love basking in the sunlight but a cozy spot near a window will do just fine.
No sun? No problem! A simple grow light can substitute for natural sunlight. And when it comes to watering, think of it as tucking them in with a bedtime story. A gentle mist is all they need to grow.
Harvest Time The best part about microgreen farming at home? The wait is short. In just 1-3 weeks, you’ll be ready to harvest. It’s like magic – one day they’re just tiny seeds, and the next, they’re ready to jazz up your meals.
**The Planting Process**
Starting a **microgreen farming at home** journey is like unlocking a treasure chest of nutrition right on your windowsill. These tiny plants pack a punch of flavor and vitamins, making them a superhero addition to any meal. So, let’s dive into the green world of microgreens and discover how you can grow these little wonders in the comfort of your own home.
**Choosing Your Seeds** First things first, selecting your seeds is like picking your team for a game. You want the best players. There are many options: radishes, kale, arugula, and more.
Think about what flavors you love in your food. That will guide you in making your choice. **Setting Up Your Growing Space** You don’t need a garden or a big space.
A small corner on your kitchen counter or windowsill works just fine. Make sure it gets some sunlight. Sunlight is like a magic ingredient that helps your microgreens grow.
**The Right Soil and Containers** When it comes to soil, think of it as the cozy bed for your seeds. It needs to be light and fluffy. You can use shallow trays or even recycled containers.
Just make sure they have holes at the bottom for water to drain. **Planting Your Seeds** Sprinkle your seeds over the soil like you’re seasoning your favorite dish. Then, gently press them down.
**Harvesting Your Microgreens**
Embarking on **microgreen farming at home** is akin to unlocking a treasure trove of nutrition in your very living space. It’s a journey that transforms tiny seeds into lush, flavor-packed greens with a few simple steps. This venture is not only a feast for the eyes but a powerhouse of vitamins and minerals, all crammed into miniature versions of your favorite vegetables and herbs.
Let’s dive into how you can start this green adventure from the comfort of your home. **Choosing the Right Seeds** First things first, selecting the right seeds is crucial. Think of it as casting the main characters for your garden play.
Opt for seeds specifically labeled for microgreen use to ensure they are untreated and safe for consumption. From spicy radishes to sweet peas, the variety is vast, allowing you to curate your very own microgreen medley. **The Perfect Home: Soil vs.
Hydroponics** Next up, setting up the perfect home for your tiny greens. You have two main options: soil or hydroponics. Soil is the traditional route, offering a familiar bed for your seeds to sprout.
On the flip side, hydroponics invites you into a soil-free world, where water does all the work. Both methods have their charm, but starting with soil might be a bit easier for beginners. **Let There Be Light** Sunlight, the lifeblood of plant growth, plays a starring role in your microgreen farm.
A sunny windowsill can be the perfect spot, bathing your greens in natural light. If sunshine is scarce, fret not. LED grow lights can fill in, ensuring your plants get their photosynthesis fix.
**After the Harvest: Storage & Use**
Unlock the Green Thumb: Microgreen Farming at Home Have you ever thought about growing your own food, but felt like you didn’t have enough space or time? Well, microgreen farming at home might just be the perfect solution for you. It’s like unlocking a hidden green thumb you never knew you had! Microgreens are tiny, young plants that pack a punch in terms of flavor and nutrients. Best of all, they’re super easy to grow, making them a fantastic project for gardening newbies and seasoned pros alike.
Getting Started: The Essentials First things first, you’ll need some supplies. But don’t worry, the list is short and sweet. You’ll need some seeds (think radishes, kale, or basil), a shallow tray, potting soil, and a sunny spot in your home.
Yes, that’s really it! The simplicity of microgreen farming is part of its charm. You can find these items at your local garden store or even online. Planting Your Seeds: A Step-by-Step Guide Now, let’s get down to the nitty-gritty: planting your seeds.
Begin by filling your tray with soil, but don’t pack it down too hard. Sprinkle your seeds evenly across the top, then lightly cover them with a bit more soil. Give them a gentle water and place the tray in a spot that gets plenty of sunlight.
Keep the soil moist, but not soggy, and in just a few days, you’ll see the magic start to happen. Sprouts! Harvest Time: Enjoying Your Greens In about 1-2 weeks, your microgreens will be ready to harvest. The best part? It’s super simple.
Just grab a pair of scissors and snip the greens right above the soil. You can enjoy them fresh in salads, sandwiches, or as a garnish to add a pop of color and nutrition to your meals. Why Microgreen Farming Rocks Let’s talk about why microgreen farming at home is so awesome.
**Troubleshooting Common Problems**
Embarking on the journey of **microgreen farming at home** is like unlocking a treasure chest of nutrition right in your living space. These tiny greens, packed with flavors and nutrients, are not just a garnish but a powerhouse of vitamins. Let’s dive into how you can grow these little wonders at home, making your meals not only tastier but also healthier.
**Choosing Your Seeds** First off, selecting the right seeds is crucial. You can opt for broccoli, radish, or even peas. These are not just easy to grow but also rich in nutrients.
Remember, the quality of seeds determines the quality of microgreens you harvest. **Setting Up Your Growing Space** You don’t need a vast garden for microgreen farming. A small tray on your windowsill works wonders.
Ensure it gets enough sunlight. If sunlight is scarce, consider a grow light. The key is to provide your tiny greens with the right amount of light and warmth.
**The Planting Process** Begin by filling your tray with soil, but don’t pack it too tightly. Sprinkle your chosen seeds evenly across the surface. Then, lightly cover them with a thin layer of soil.
Water gently to avoid displacing the seeds. A spray bottle is perfect for this task. **Caring for Your Microgreens** Microgreens aren’t demanding.
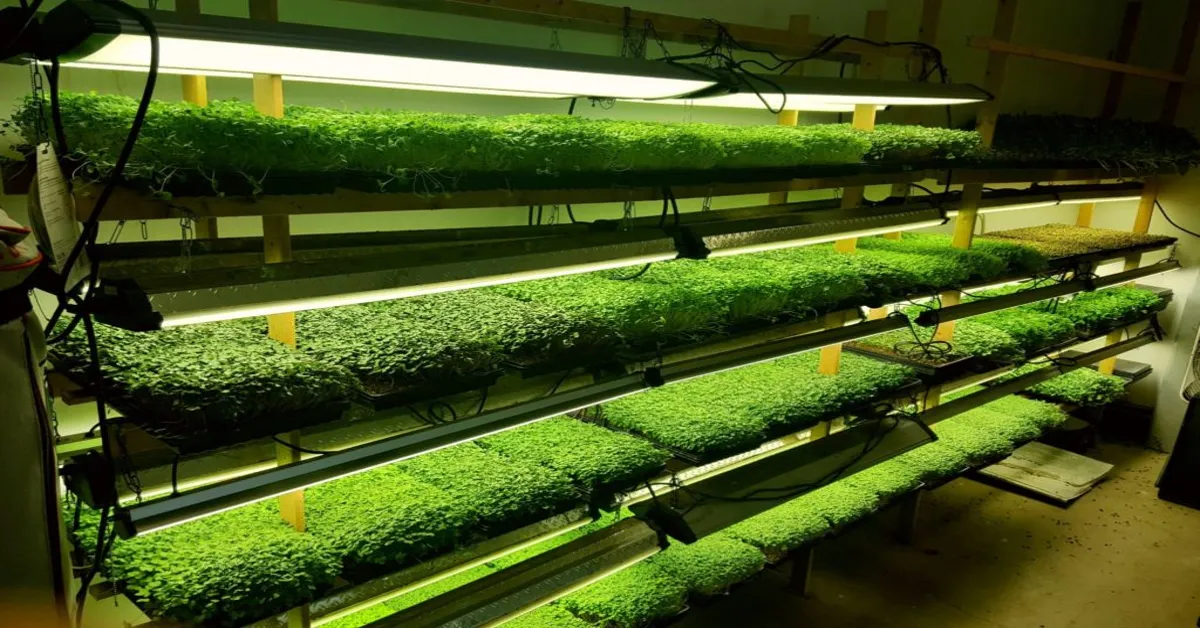
**Scaling Up Your Microgreen Farm**
Starting a **microgreen farming at home** is like unlocking a treasure chest of nutrients right on your windowsill. Let’s dive into this green adventure and discover how simple it is to cultivate a mini garden that packs a punch in terms of flavor and nutrition. **First Steps: Setting Up Your Microgreen Garden** Getting started is as easy as pie.
You’ll need a shallow tray, some quality soil, and microgreen seeds of your choice. Think of the tray and soil as the cozy bed for your seeds. Sprinkle them evenly across the soil, cover them lightly, and give them a gentle shower of water.
Place the tray in a spot that gets plenty of sunlight, and you’re off to the races! **From Seed to Salad: Watching Your Microgreens Grow** After planting your seeds, the waiting game begins. But don’t worry, it’s a short one! Microgreens are like the fast-food of the plant world; they’re ready to harvest in just 1-3 weeks. You’ll see them sprout and grow into little green shoots.
It’s a bit like watching a miniature forest come to life on your kitchen counter. **Harvest Time: Enjoying the Fruits of Your Labor** When your microgreens have grown a couple of inches tall, it’s time to harvest. Grab a pair of scissors, snip them right above the soil, and voila! You’ve got a fresh, homegrown topping for salads, sandwiches, or any dish that could use a sprinkle of green goodness.
**Why Microgreen Farming at Home Rocks** Microgreen farming at home is not just fun; it’s a powerhouse of benefits. These tiny greens are loaded with vitamins and minerals. Plus, they can add a burst of flavor and color to your meals.
And let’s not forget the satisfaction of eating something you’ve grown yourself. It doesn’t get fresher than that! So, there you have it—a beginner’s guide to starting a microgreen farm at home. It’s easy, quick, and rewarding.
Read More
https://microgreensfarming.co/microgreen-farmers-market/
https://microgreensfarming.co/microgreen-farms-near-me/
https://microgreensfarming.co/what-is-microgreen-farming/
https://microgreensfarming.co/how-much-money-do-microgreen-farmers-make/
Statistical Information: microgreen farming at home
| Aspect | Statistic | Insight |
|---|---|---|
| Space Requirements | 10 sq ft | Microgreen farming can be efficiently started in as little as 10 square feet of space, making it highly accessible. |
| Growth Cycle | 7-21 Days | Microgreens have a rapid growth cycle, ready to harvest in just 7 to 21 days, offering quick returns on investment. |
| Water Usage | 2 Liters/Day | Home-based microgreen farming is water-efficient, requiring as little as 2 liters per day for a small setup. |
| Nutritional Value | Up to 40 Times | Microgreens can contain up to 40 times higher levels of vital nutrients compared to mature vegetables. |
| Popularity Increase | 82% | Interest in microgreen farming at home has surged by 82% in recent years, reflecting its growing popularity. |
| Cost Efficiency | 70% Savings | Growing microgreens at home can lead to up to 70% savings compared to purchasing from the market. |
FAQs
Growing your own tiny, leafy plants at home sounds fun, right? Welcome to the world of microgreen farming at home! It’s not only simple but can add a burst of color and nutrition to your meals. Let’s dive into some frequently asked questions that will help you get started on your microgreen journey.
What exactly are microgreens?
Microgreens are young vegetable greens. They are older than sprouts but younger than full-grown plants. Usually, they are harvested just after the first leaves have developed. They’re packed with nutrients and add a lovely flavor and color to dishes.
Can I really grow microgreens at home?
Absolutely! Growing microgreens at home is easy and doesn’t require a lot of space. You can grow them on your kitchen counter, a windowsill, or any spot that gets some light. It’s a fun project you can do with just some seeds, soil, and a container.
What do I need to start my own microgreen farm at home?
To start, you’ll need some shallow trays or containers, quality potting soil, microgreen seeds (like radishes, kale, or arugula), water, and a spot that gets light. You don’t need special equipment, and you’ll see your tiny greens sprouting in just a few days!
How do I take care of my microgreens?
Microgreens are easy to care for. Make sure they get enough light, keep the soil moist but not soaked, and ensure they have good air circulation. In about 2-3 weeks, they’ll be ready to harvest with just a pair of scissors.
Why should I try growing microgreens?
Growing microgreens is a quick way to grow your own food at home. They’re super nutritious, adding vitamins, minerals, and flavor to your meals. Plus, it’s a rewarding hobby that can make your dishes look and taste amazing.
Can I grow microgreens without soil?
Yes, you can! Hydroponic microgreen farming is a method where you grow them in water instead of soil. It’s a bit more advanced but totally possible at home. You’ll need a water tray and some hydroponic growing mats instead of soil.
Starting your microgreen farm at home is a delightful and easy way to bring fresh greens into your diet. With just a little care, you can enjoy your own homegrown greens in no time!
Conclusion
Growing microgreens at home is not just a hobby, but a step towards sustainable living. These tiny plants pack a nutritional punch and can be grown easily in small spaces, making them perfect for urban dwellers. By nurturing these greens, you’re not only contributing to your health but also reducing your carbon footprint, as local produce eliminates the need for transportation.
Let this journey of microgreen farming inspire you to take more steps towards a greener lifestyle. Remember, every small effort counts in making our planet healthier. Let’s embrace the joy of growing our food, one tiny green at a time.